
|
THE SCNA NATURIST COOKBOOK
Breakfast | Holiday Specific | Cooking at the Beach |
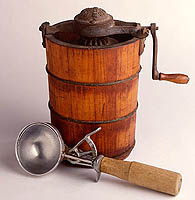
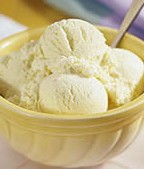
FRESH HOME MADE ICE CREAM ON THE BEACH!
THE BASICS OF ICE CREAM MAKING
The main constituents of ice cream are fat, milk solids-not-fat (skim-milk powder), sugar, gelatin (or other suitable stabilizer), egg and flavouring.
Milk Products. A variety can be used: cream, whole milk, condensed milk and instant skim-milk powder. The recipes stated below proved satisfactory using whipping cream (32-35% fat), table cream (18% fat) and whole milk. The fat gives the product richness, smoothness and flavour. Skim-milk powder is used to increase the solids content of the ice cream and give it more body. It is also an important source of protein which will improve the ice cream nutritionally. Use good quality, fresh powder to avoid imparting a stale flavour to the ice cream.
Sugar. This is a common ingredient to use as a sweetener. It increases the palatability and improves the body and texture.
Gelatin. This assists in absorbing some of the free water in the ice cream mix and helps prevent the formation of large crystals in the ice cream. It also gives substance or a less watery taste when the ice cream is consumed. The eggs are added to make the fat and water more miscible and also to improve the whipping ability which gives the ice cream greater resistance to melting.
Flavors. Although vanilla is the flavor added to all of the mixes listed here, you may add flavours to suit you taste.
CHEF'S NOTES AND COMMENTS:
Recipes for homemade ice cream vary from the super smooth, egg-and-cream-rich ices of the old south to the plain milk and sugar kind, but all can be adapted to a coffee can ice cream maker - just use a half recipe or less. However you do it, home made ice cream, while usually more expensive than store bought ice cream, is frugal entertainment as well as a special treat to eat.
Ingredients:
Table cream 2 litres (2 US quarts)
Ingredients:
Whole milk 2 litres (2 US quarts)
Ingredients:
Coffee whitener 2 litres (2 US quarts)
INSTRUCTIONS:
Preparation of the Ice Cream Mix
1. The mix (unfrozen ice cream) has to be cooked (pasteurized). For pasteurizing the mix, it is best to use a double boiler to prevent scorching.
2. Place the liquid ingredients (milk, cream or coffee whitener) in the upper section of the double boiler. Beat in the eggs and the skim-milk powder. Mix the gelatin with the sugar and add to the liquid with constant mixing. While stirring, heat to about 70oC. Place the container in cold water and cool as rapidly as possible to below 18oC.
Aging the Mix
The ice cream mix is best if it is aged (stored in the refrigerator) overnight. This improves the whipping qualities of the mix and the body and texture of the ice cream. If time does not permit overnight aging, let the mix stand in the refrigerator for at least four hours. After the aging process is completed, remove the mix from the refrigerator and stir in the flavouring.
Freezing the Mix
The freezing procedure has a two-fold purpose, the removal of heat from the mix and the incorporation of air into the mix. Heat is removed by conduction through the metal to the salt water brine surrounding the freezing can. This transfer of heat depends upon the temperature of the brine, the speed of the dasher and how well the dasher scrapes the cold mix from the surface of the freezer can. The dasher speed and surface contact are important to achieve complete removal of the frozen ice cream from the wall of the freezer can. A brine made from 500 grams of salt and 5 kilograms of crushed ice (one pail full) makes a good freezing mixture.
Note: One trick to making ice cream on the beach is to substitute a bit of dry ice and ocean water, to freeze their ice cream, instead of carrying a bag of salt down to the beach.
1. Before starting to freeze the ice cream, make sure all parts of the freezer coming in contact with the ice cream are clean and have been scalded. Let the can cool before pouring in the mix. Place the empty can in the freezer bucket and insert the dasher ensuring both the can and the dasher are centred. Pour the cold, aged mix into the freezer can. The can should not be filled over two-thirds full to allow sufficient room for air incorporation.
2. The recipes listed here will fill the freezer can (5 quart U.S.) to just below the fill line. Attach the crank mechanism (we assume you have no electricity available), and latch down securely.
3. Start turning the crank, and turn it almost continuously for 20 to 30 minutes. (You can take turns doing this among your friends on the beach as your arms get weary.) A second person should immediately begin adding crushed ice around the can sprinkling it generously with salt (or sea water.) Try to add the salt and ice in the same one to ten proportion to get the proper brine temperature. After the bucket is filled with ice to the overflow hole, pour a little water over the ice to aid in the melting process.
4. After 30 minutes, the ice cream will be softly frozen. Scrape the ice cream from the dasher and either scoop into suitable containers or pack in the freezer can. Immediately place the ice cream in the deep freeze to harden, or, if freezer facilities are not available, the ice cream can be left in the can, the lid plugged with a cork and placed back into the bucket. Repack the freezer with more ice and salt, cover with a heavy towel and set in a cool place to harden until serving time (give it at least an hour) This will require further addition of ice and salt depending on the length of time the ice cream is being held.
The yield from the recipes listed above should be three to four litres.
Hints for Making Good Ice Cream
1. If the ice cream is very soft, the brine is not cold enough. More salt should be added to reduce the brine temperature.
2. If the ice cream is coarse and ice in less than 20 minutes, the brine has become to too cold too quickly. Too much salt has been used.
3. Make the ice cream mix the day before it is frozen to get a smoother product and a higher yield.
4. If you are used to using an electric maker at home, remember that electric freezing takes longer than hand operated buckets.
5. Use crushed ice for freezing.
6. Add liquid flavors before freezing but if you want to add fruits or nuts, add them after freezing and before hardening. Use a wire whip to blend ingredients for best results.
7. Clean the salt off all the metal parts of the freezer to prevent corrosion.
MAKING BEACH ICE CREAM IN A COFFEE CAN
You don't have to own an ice cream maker or any fancy equipment to do it. You can use just about anything for an ice cream freezer as long as the container will fit into about anything else! To make ice cream without an ice cream maker:
1. You'll need two containers, one that will fit inside the other with at least an inch to spare.
2. Two sizes of coffee cans work well for this, but any food safe containers will do. Metal is best, but glass will work, too. Plastic does NOT work, as it doesn't conduct the cold very well. Be sure to tape or tie the lid down firmly on the smaller container. Place it in the larger coffee can or other container and put in enough ice, alternating with layers of rock salt two or three times, to completely pack the cavity between the two cans.
3. Seal the larger can well, too, then go play 'kick the can' with it, or roll it back and forth between kids, or just hold and jiggle it like you would to hand churn butter for anywhere from 10 to 20 minutes. You can also make drain holes in the bottom of the larger container, punching them with a nail, but it can be messy if the can will be passed back and forth.
4. To check for "doneness", it won't hurt to take off the lid and stir. If it's not frozen solid enough, drain the water caused by melting ice, repack and shake or roll again.
5. Remember, recipes for homemade ice cream vary, but all can be adapted to a coffee can ice cream maker - just use a half recipe or less.
Regular Vanilla Ice Cream
Instant skim-milk powder 350 ml (1.5 cups)
Sugar 450 ml (2 cups)
Gelatin one 7 g (1/4 oz.) pkg.
Egg one med or large
Vanilla 10 ml (2 teaspons)
Calories per 100 g 230
Low Calorie Vanilla Ice Cream
Instant skim-milk powder 500 ml (2 cups)
Sugar 350 ml (1.5 cups)
Gelatin one 7 g (1/4 oz.) pkg.
Egg one med or large
Vanilla 10 ml (2 teaspons)
Calories per 100 g 125
Milk Substitute Vanilla Ice Cream
Instant skim-milk powder 350 ml (1.5 cups)
Sugar 500 ml (2 cups)
Gelatin one 7 g (1/4 oz.) pkg.
Egg one med or large
Vanilla 10 ml (2 teaspoons)
Calories per 100 g 210
Note: Liquid coffee whitener (usually purchased frozen) is a cream substitute here. It will yield a slightly different flavour which is still very acceptable. The texture of the ice cream is very creamy. Liquid coffee whitener offers the convenience of being stored frozen in your freezer and is readily available if a quick decision is made to make ice cream.
Submitted by those unflappable cooks from the Black's Beach Bares, Dave and Lloyd.